It's time for my Spring Sale! With Mother's Day around the corner and graduations and…
Have you ever come across a piece of art or hand-crafted item and wondered to yourself: How did she do that?
Wouldn’t you like to catch a glimpse of the steps behind the finished product? Take a peek at how she transformed raw materials like paint or wood or fabric into the fully realized object you see before you?
A few months ago, I decided to document my process of creating a set of custom hoop art for a special customer.
My customer contacted me several months before Mother’s Day to talk about making a very special gift for her sweet mom.
She wanted me to embroider a very special song lyric onto a hoop. Her only requirement was to incorporate “pastel colors with an emphasis on blues and purples”. The design would be left to my creative imagination. I love when a customer gives me free reign on designing a custom piece. It’s a sign that they trust me to create something they will love.
With this very special assignment in hand, I snapped photos along the way.
I created my own hashtag on Instagram: #makinghoopart. If you do a search on Instagram for this hashtag, my photos will pop up. How cool is that?
Not only does this answer the question of: how did she do that? But, it helped me to find beauty during the process. To enjoy the process of creating. With each photo I tried to show the raw materials, the steps of #makinghoop art, and to make it pretty!
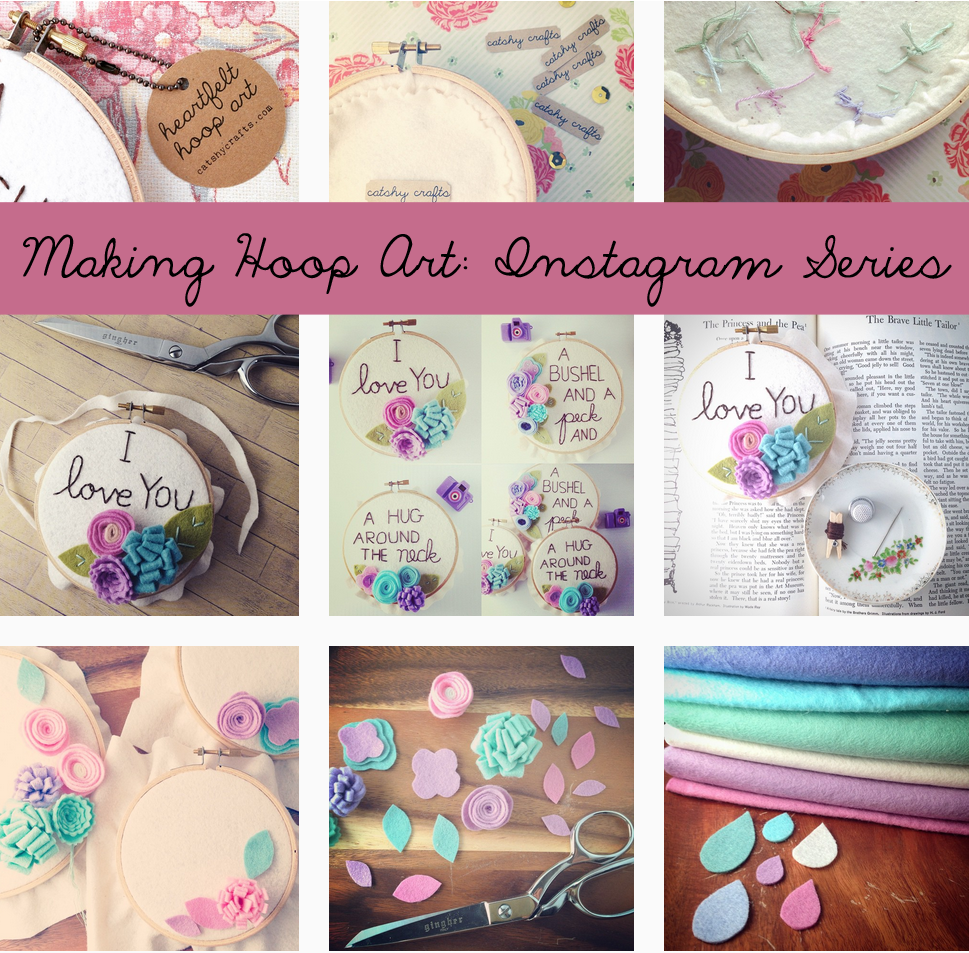
In case you missed my Instagram series: #makinghoopart, I’d love to share it with you here on the blog, along with extra details I didn’t share on my IG feed.
Step 1: Sand hoops until smooth. Beware of splinters.
View original instagram or visit INK361
Step 2: Select colors for custom hoop art from my felt stash. Play with different color combinations until I find one that will inspire me as well as please my customer!
View original instagram or visit INK361
One of my favorite parts of the entire process – choosing colors!
Step 3: Free-hand cut floral shapes and leaves as well as dimensional flowers.
View original instagram or visit INK361
This is probably my favorite part — making flowers.
Step 4: Stretch background into embroidery hoop and begin to arrange and rearrange felt flowers. Repeat as needed.
View original instagram or visit INK361
Even though, it often takes me several arrangements to find the right one, I love the process. It’s my playtime!
Step 5: Hand-stitch custom message on white felt with a sharp embroidery needle and chocolate brown cotton floss. Vintage thimble optional.
View original instagram or visit INK361
I love writing on felt with hand stitches.
Step 6 – 7: Repeat step 5 until you spell out the cutest message ever!
View original instagram or visit INK361
For these hoops, I used a mix of print and cursive, making the hoops even more whimsical.
Step 8: Now to finish off the hoop art! Neatly trim excess felt around the hoop. This will make the felt less bulky and easier to wrap around the hoop.
View original instagram or visit INK361
Step 9: Wrap felt around hoop and secure with glue.
View original instagram or visit INK361
I use hot glue for this step. Minor burns on fingers is my occupational hazard.
Step 10: Cut out a circle of felt to neatly finish the back of the hoop art and add a Catshy Crafts kraft tag.
View original instagram or visit INK361
All my tags are made by me – I have a passion for Photoshop and kraft paper.
Step 11: Add a hang tag on a ball chain to the metal clasp. Now it’s ready to wrap and ship!
View original instagram or visit INK361
I love the ball chain! It adds a unique + vintage touch.
And there you have it! Hope you liked the behind-the-scenes look at #makinghoopart.